Thanksgiving dinner was great! It was my first time hosting, and the turkey turned out perfectly : ) I was a little worried since the thermometer read 180 and it was only supposed to cook until 170, but it wasn't dry or overcooked. I've cooked a turkey, now I feel like I can tackle anything!
Here is our menu for this week. I am trying to work in Thanksgiving leftovers : )
Monday - Turkey rice soup and peasant bread
Tuesday - Rice and beans
Wednesday - Shepherd's pie
Thursday - Sloppy Joes (from freezer) and carrot fries
Friday - Turkey tetrazzini
Monday, November 28, 2011
Thursday, November 24, 2011
Wednesday, November 23, 2011
The best green beans
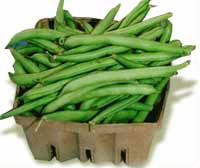
I never liked steamed or boiled green beans very much. I really like vegetables in general, but green beans always seemed to me to be really lacking in flavor. But I recently tried sauteeing frozen green beans in butter, and sprinkling with a little bit of salt. And they were amazing! Maybe this isn't a revelation to most people, but it is to me. I just wanted to share my green bean epiphany so that everyone else can start loving green beans too :)
This post is linked to: Works for me Wednesday
Tuesday, November 22, 2011
Toddler bib - cute and practical
I combined a few bib ideas to make one that is practical for Titus, who is your average messy toddler. I made a bib out of laminated cotton only, but it seemed kind of flimsy to me. So, I decided to try backing it with terry cloth. I have made cotton bibs backed with terry cloth as baby shower presents, but they are just little bibs for drool protection. The resulting hybrid bib features laminated cotton, which is waterproof, and terry cloth, which doubles as a washcloth after the meal. It is also big enough to protect a large area of Titus' clothing. So far I have been very happy with this bib, so I created a tutorial so you can make them too!
You will need:
- A bib pattern, or an already made bib to trace
- Sewing machine and thread
- Velcro
- Laminated cotton
- Terry cloth (I used part of a hand towel leftover from another project)
1. Trace the bib pattern onto the back of the laminated cotton with a sharpie. I'm sorry I don't have a PDF file for this, my computer skills are just not that sophisticated yet. The pattern I used is 8" by 13.5". If you trace around an existing bib you will need to add 1/4" all around for seam allowance.

2. Pin the laminated cotton piece to the terry cloth, right sides together

3.Cut out the bib along the sharpie line, leaving the pins in place

4. Sew around the perimeter of the bib with a 1/4" seam allowance. Leave a 2-3" gap at the bottom of the bib for turning the bib right side out (it should still be inside out at this point)

5. Trim off any excess fabric, and clip slits every 1/2" or so around all the curves, as shown below. This will enable the curved parts to be turned more smoothly.

6. Turn the fabric right side out, it should look like this:

7. Turn the fabric of the unsewn section under and pin it, making sure it looks even
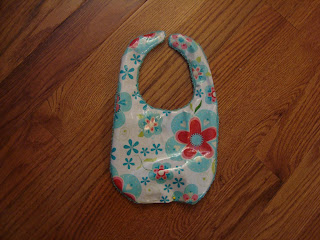
8. Topstitch around the bib, 1/8" from the edge. By topstitching you should sew up the section of the bib that was open, so there should be no raw edges or openings

9. Cut a 1" square piece of Velcro, and sew the fuzzy side onto the laminated cotton side of one neck strap (check the placement of your Velcro before you sew it on, to make sure the bib closes correctly. It would be frustrating to sew it onto the wrong side)

10. Sew the pokey side onto the terry cloth side of the other neck strap

11. Yay! You are done! Now put your bib on the nearest messy toddler and see it in action :)

This post is linked to: Sew Cute Tuesday
Monday, November 21, 2011
Menu Plan Monday - November 21st
This will be a busy week, due to Thanksgiving, and a craft fair I am in on Black Friday. However, we still need to eat. Here are the dinners I have planned for this week:
Monday - Chicken quesadillas, corn, and spanish rice
Tuesday - Pepper steak and brown rice
Wednesday - Italian chicken (from the freezer), bowtie pasta, and peas
Thursday - Thanksgiving!
Turkey, rolls, sweet potatoes, mashed potatoes, green beans, and lemon meringue pie
Friday - Thanksgiving leftovers : )
Friday, November 18, 2011
Cooperative freezer cooking day

Today I did a freezer cooking day with my 3 youngest cousins, I believe they are 12, 8, and 6 years old. They helped make all the food, and we split the finished product. They had a great time making bread, assembling burritos, and eating cookies : ) And I was so happy to have someone to cook with, and also to help watch Titus. The 6-year-old is a little young to be able to help much with the cooking, but Titus had SO much fun playing with her! It was definitely a win-win situation for everyone, and we all agreed we'll have to do this again sometime : )
Unfortunately I didn't get any pictures of the food we made, because we were hurrying to get everything done. We made all the following food in THREE HOURS! It just goes to show what you can accomplish if you have great helpers ; )
- 20 bean, rice, and cheese burritos
- 8 cups cooked pinto beans
- 3 quart size bags teriyaki chicken
- 4 quart size bags Italian chicken
- 4 lbs. sloppy Joe meat
- 2 dozen no-bake cookies
- 24 honey whole wheat rolls
Wednesday, November 16, 2011
Car seat cover
The cover on Titus' car seat was getting a little worn out. There were holes in it, and I was just ready for something new. I debated trying to make a whole new cover, then decided that would take way to long, and the chance that it would turn out terrible was too great. So here is what I did instead:


I used flannel for this project, because I thought it would be cozy in the wintertime, but you could use regular cotton to make a cover that would be suitable for summer as well. I hope this is helpful to anyone considering recovering an existing car seat cover. My method was not super finished and professional, but it looks fine, and so far has held up well :)
This post is linked to: Sew Cute Tuesday
- I took a yard of flannel (that my mother-in-law had so generously given me) and pinned it to the existing cover. When recovering a car seat cover it is very important to pin the fabric down well, and make sure to get it into all the nooks and crannies.
- I zig-zag stitched around the edges, and trimmed the fabric to the shape of the carseat after it was all sewn on.
- Then I stitched around the edges again, with a regular running stitch, to reinforce the seam and to tack down the underside of the fabric. I didn't turn it under or anything, because no one will see that part, and I don't care about it.
- Finally, I cut out the slits for the straps and used a machine satin stitch to bind the edges of the cuts I had made.
- And that is it! Super easy! Next I am going to make covers for the shoulder straps out of the scraps of flannel that I was left with.


I used flannel for this project, because I thought it would be cozy in the wintertime, but you could use regular cotton to make a cover that would be suitable for summer as well. I hope this is helpful to anyone considering recovering an existing car seat cover. My method was not super finished and professional, but it looks fine, and so far has held up well :)
This post is linked to: Sew Cute Tuesday
Monday, November 14, 2011
Menu Plan Monday - November 14th
Our menu for this week:
Monday - Tuna melts, carrot sticks, and potato chips
Tuesday - Chicken Picatta, angel hair pasta, and peas
Wednesday - Baked Mexican bean dip and tortilla chips
Thursday - BBQ meatballs, cream scalloped potatoes, and green beans
Friday - Pepper steak and brown rice
This post is linked to: Menu Plan Monday at Organizing Junkie
Saturday, November 12, 2011
Thursday, November 10, 2011
Titus - 15 months
My baby is 15 months old now. He really isn't much of a baby anymore, he is really a toddler now. Titus is so sweet and fun! George and I think he is just about the best baby to the walk the planet. We may be a tiny bit biased, but I know lots of other people enjoy him too : )
Titus is very friendly. He will often go up and say "Hi" to people, and wave "goodbye" when they leave. He also says "all done", "uh oh", "hot", and "tea" (not always within the correct context :) He has 9 teeth now and is working on the 10th one. He can walk, run, dance, and go up and down stairs all by himself. I am so blessed to be the mama of this sweet, happy little boy!
Here are pictures of some of his favorite activities:
 |
| Eating |
 |
| Going down the stairs |
 |
| Dancing |
 |
| Cooking |
 |
| Being a cutie pie! Love those dimples :) |
Tuesday, November 8, 2011
Needle book
Sometimes I like to bring hand sewing or mending projects with me when I go somewhere, but I have to round up all the supplies. So, yesterday I decided to make a little needle book that I keep stocked with pins, needles, and scissors, and just throw in my bag with some thread if I want to bring my sewing projects with me. I used this sweet little tutorial, that I found through Sew, Mama, Sew! Sew, Mama Sew is doing their annual Handmade Holidays, and there are so many great ideas and tutorials. If you are considering making some homemade gifts this year, definitely check out Sew, Mama, Sew!
I used Amy's basic instructions for this needlebook, but I changed a few things, so I took pictures of what I did differently. This is not a tutorial, a wonderful tutorial has already been written, I am just sharing some pictures of what I made. :)
I used fabric from a thrifted sheet, and a scrap of pink fabric to make the needlebook.
 I cut out a flower from the sheet, and appliqued it to the pink fabric using fusible web, and hand sewing it for stability.
 I also added a button because I like buttons :)
 I quilted it onto the batting, but unlike the tutorial, I machine quilted it. Hand quilting looks very cute, but is a little time consuming and I was trying to finish this before Titus woke up from his nap.
 I also added some rickrack because it is so cute
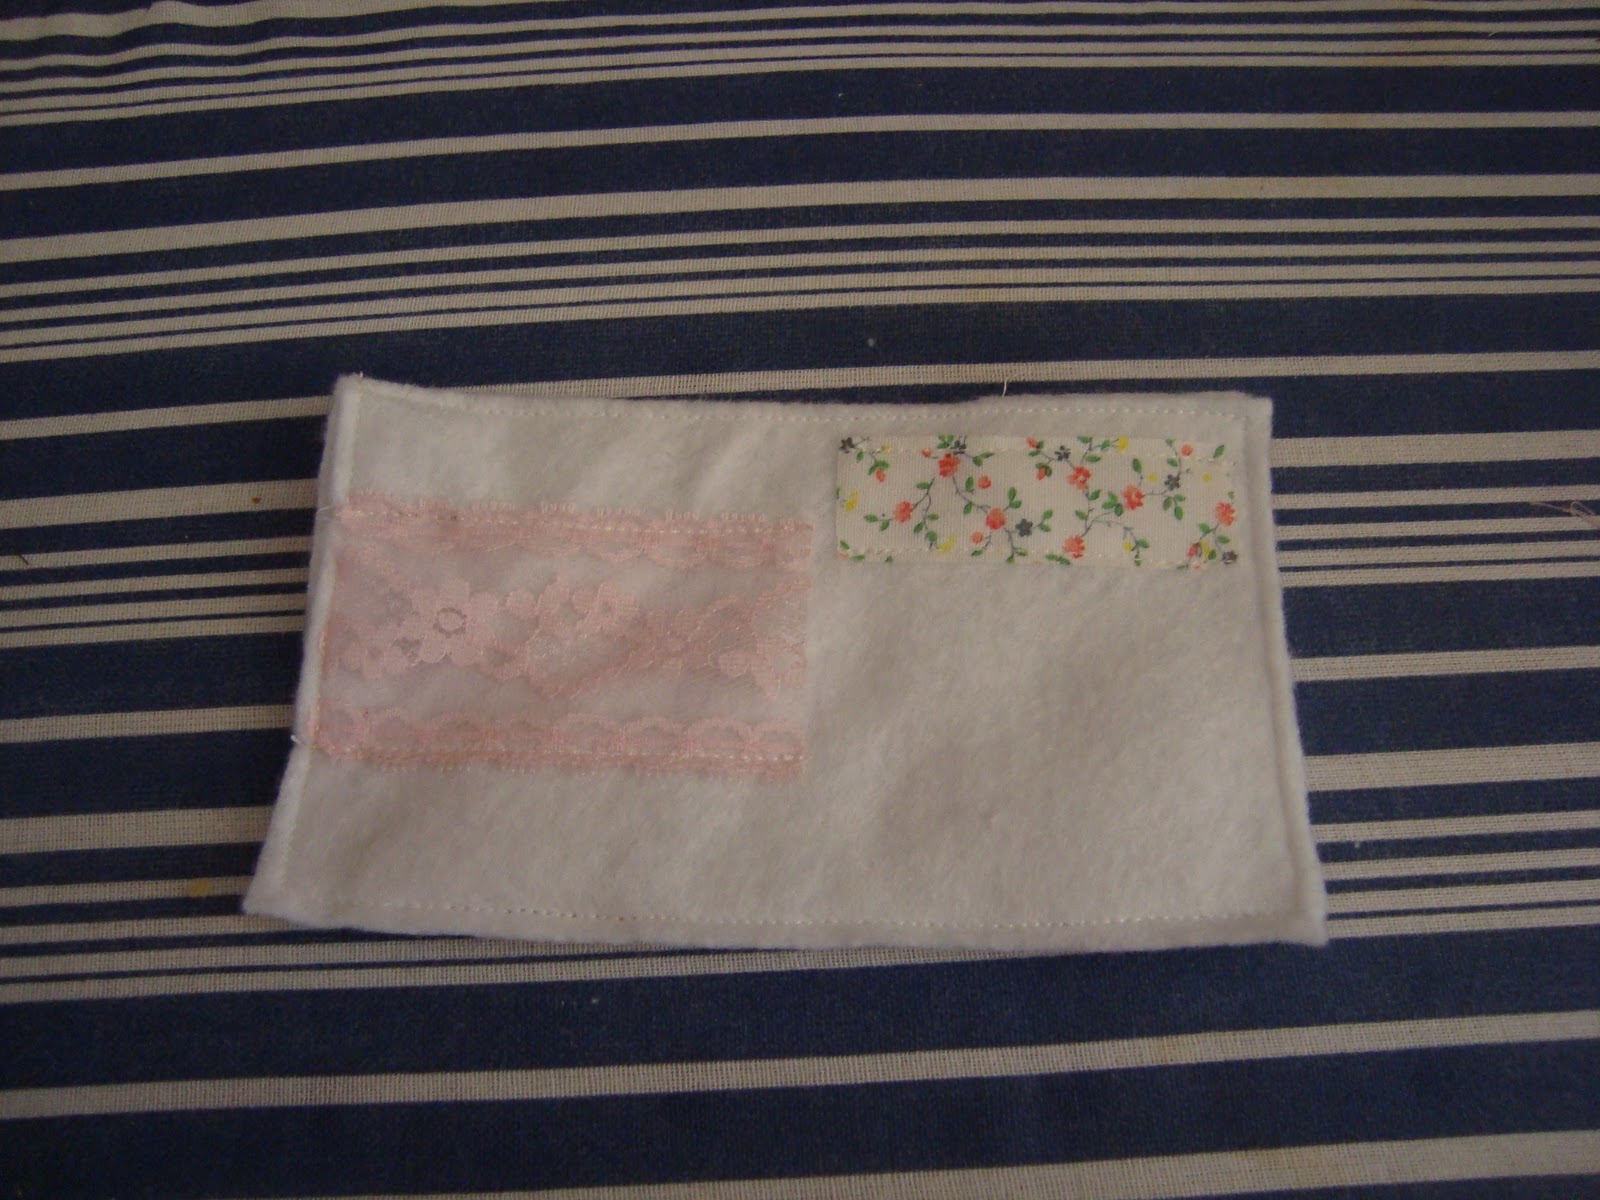
 This is what the inside of the needle book cover looked like
 I added some ribbon and lace to the pages for the pins and needles
 And a made a little holder for my tiny pair of scissors
 This is what the finished book looks like
 There is a page for straight pins and safety pins
 A page for scissors
 And a page for needles
 I added the button closure on the back instead of the front, because if I put it on the front, it would have taken away from the applique.
This post is linked to: Making the World Cuter Monday and Sew Cute Tuesday
I used Amy's basic instructions for this needlebook, but I changed a few things, so I took pictures of what I did differently. This is not a tutorial, a wonderful tutorial has already been written, I am just sharing some pictures of what I made. :)
I used fabric from a thrifted sheet, and a scrap of pink fabric to make the needlebook.


This post is linked to: Making the World Cuter Monday and Sew Cute Tuesday
Monday, November 7, 2011
Menu plan Monday - November 7
Here is what we are eating this week:
Monday - Roast beef, carrots, and mashed potatoes
Tuesday - Bourbon chicken, brown rice, and broccoli (moved from last week)
Wednesday - Chili and cornbread
Thursday - Chicken Picatta, angel hair pasta, and peas
Friday - Vietnamese fried rice (from the More With Less cookbook)
This post is linked to: Plan it - Don't panic
Friday, November 4, 2011
Apple crisp

This is a wonderful fall recipe! It is warm and comforting, and is super easy to make. You can peel the apples if you don't care for the skins, but I usually leave them unpeeled and I think it still tastes great :)
6-7 apples, cored and sliced
1/2 cup cold butter, cut into small pieces
3/4 cup brown sugar
3/4 cup oatmeal
3/4 cup flour
1 tsp cinnamon
Grease a 9 X 13" pan and fill it with the sliced apples. To make the topping, combine the brown sugar, flour, oatmeal, and cinnamon. Cut the butter into the dry ingredients with a pastry cutter, until the butter is evenly distributed among the topping. Sprinkle the topping over the apple slices and bake at 350 degrees for 45 minutes.
This post is linked to: The Grocery Cart Challenge recipe swap and Simply Delish Saturday
Thursday, November 3, 2011
Washing cloth diapers
Welcome to part three of my series on cloth diapering. Today I will be talking about washing cloth diapers. You can read about buying and using the diapers in part one and part two.
As I mentioned in yesterday's post, I have 24 cloth diapers, which allows me to wash diapers 2-3 times a week, and have diapers to use in between washings. My son is 15 months old, so he can go longer between diaper changes. Newborns should be changed often, so you may have to wash more frequently with a younger baby.
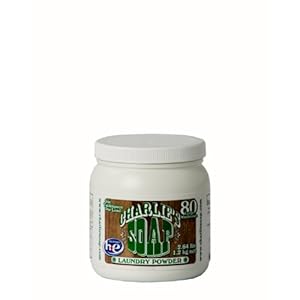 I have BumGenius and Fuzzibunz diapers, and they are very simple to use. Every couple of days I carry the diapers and inserts in the diaper pail liner I made down to the washing machine and dump them in. I add about 1/2 a scoop of Charlie's Soap to the load and wash once on cold, then I wash the diapers a second time on hot.
You can use many different kinds of laundry detergent, but you should buy a detergent that is considered safe for cloth diapers. Some things to look for are: no enzymes (then can irritate the baby's skin and cause a rash), no dyes or fragrances, and low/no-sudsing.
BumGenius and Fuzzibunz recommend adding bleach to your washing routine about once a month or so. I prefer not to use bleach, so I will do that occasionally if I think it is warranted, but I usually rely on the sun to bleach the diapers and inserts.
 After the diapers are done being washed (sometimes I run them through another hot cycle without detergent if they still smell) I hang them up to dry, either on the line outside, or the drying rack downstairs. I prefer to hang the diapers outside, because the sun helps bleach them, and they smell fresher. However, if it is raining I will hang them on the rack in the basement. I occasionally dry them in the dryer if I am short on time. The dryer makes them soft & fluffy, but it will wear them out much faster. BumGenius actually recommends drying diapers in the dryer occasionally, to help the PUL to stay waterproof and tight.
I hope I remembered to say everything. Washing diapers is very easy, and probably only takes me 5-10 minutes, every couple of days. The diapers may be a little bit stained (see above picture :), but the sun can help to whiten them, or you can use chlorine bleach on the diapers. I am glad that I chose to do cloth diapers with Titus, and I hope the information I have shared will encourage others to look into cloth too!
As I mentioned in yesterday's post, I have 24 cloth diapers, which allows me to wash diapers 2-3 times a week, and have diapers to use in between washings. My son is 15 months old, so he can go longer between diaper changes. Newborns should be changed often, so you may have to wash more frequently with a younger baby.
You can use many different kinds of laundry detergent, but you should buy a detergent that is considered safe for cloth diapers. Some things to look for are: no enzymes (then can irritate the baby's skin and cause a rash), no dyes or fragrances, and low/no-sudsing.
BumGenius and Fuzzibunz recommend adding bleach to your washing routine about once a month or so. I prefer not to use bleach, so I will do that occasionally if I think it is warranted, but I usually rely on the sun to bleach the diapers and inserts.

I hope I remembered to say everything. Washing diapers is very easy, and probably only takes me 5-10 minutes, every couple of days. The diapers may be a little bit stained (see above picture :), but the sun can help to whiten them, or you can use chlorine bleach on the diapers. I am glad that I chose to do cloth diapers with Titus, and I hope the information I have shared will encourage others to look into cloth too!
Wednesday, November 2, 2011
Using cloth diapers
Today is part two of the cloth diapering series I am doing. Part one is here. I will be explaining how I make cloth diapers work for our family, and hopefully if you are reading this you will be able to glean some information that will be helpful in your decision-making process.

I have a 15-month-old son, and I have been using cloth diapers since he was 3 months old. The main reason I didn't use them before that was because his little legs were too small for the one-size diapers (he was only 4 lb. 4oz. when he was born). Now that I am more comfortable with cloth, I want to start cloth diapering earlier with the next one, using prefolds and covers. The prefold system is a lot more intimidating to me, but it has the advantage of fitting even tiny newborns.
I have learned a lot by trial and error, and I want to share what I have learned, in the hopes that other people might be able to use some of the same methods that I use.
I currently have 24 one-size pocket diapers. I have had as few as 12 diapers in my rotation, and I got by, but I really had to stay on top of the laundry, and a lot of times I resorted to disposables because I didn't have any clean diapers. With 24 diapers I wash 2-3 times a week, which is usually when the diaper pail is full, and I don't have to worry about running out of diapers.

I also use cloth wipes. To me it just makes sense, I can just throw the wipes in with the diapers and wash everything together. Before Titus was born I sewed some flannel wipes, thinking flannel would be nice and soft, but flannel is actually a little rough once it is wet, and it is not very good at removing solids. Next I tried pieces of fleece, but fleece repels water, so that didn't work very well as wipes. Finally, I decided to try some washcloths I had gotten as a shower gift, and they were perfect! The terrycloth has some texture to help dislodge sticky poop, and they are easy to maneuver, and very soft. The key is to get the very thin, inexpensive ones. I bought a pack of 10 from Kmart for $4.50. Here is an example of washcloths that look like the right kind.
I keep them in an old wipes container, and I put them in while they are still damp from the wash. I add a little bit more water so they are nice and wet, and I keep a little bottle of baby shampoo at the changing table and put a drop of that on a wipe to get Titus nice and clean if he has pooped. I would recommend having at least a dozen cloth wipes.

My diaper pail is a trashcan with a lid that I got at Target. I made 2 liners for it out of PUL, so I can just pull out the liner and wash it with the diapers. That way I don't have to wash out the diaper pail as often. To make each diaper pail liner I took a yard of PUL, and folded it in half widthwise so it was 36" X 21". Then I sewed a french seam around the bottom and side, to create a bag.
 Here is the outside, which faces the diaper pail
 And this is the shiny, waterproof inside part, which faces the dirty diapers
 Here is the liner in action! If you aren't into sewing BumGenius makes diaper pail liners that cost about $20 each. My homemade liners don't look as neat & professional, but they only cost about $5 each.
Diaper changes are usually pretty painless. Take off the diaper, pull out the liner, dump both in the diaper pail. However, if there is poop involved it becomes a little more interesting. Newborn, breastfed poop is just fine to go in the wash, I never had problems with it washing out. But once the baby starts solid foods if you don't rinse all the poop off into the toilet you will find partially digested food and other questionable things in your washing machine (gross!). You can hold the clean part of the diaper and swish it around in the toilet to dislodge the poop, but I found that to be messy and not always very effective.

A friend generously gave us her diaper sprayer, and I love it so much! It "power washes" the poop off the diaper, and is quick and efficient. The only downside that I can see to the diaper sprayer is that the spray doesn't always stay in the toilet, so it can be a little messy. That really doesn't bother me, I just wipe it up with toilet paper, but I thought it was worth mentioning.
 If I have the time, and I think about it, I stuff the clean diapers and store them in this basket, which I keep under the changing table. They look so nice and are very convenient.
However...
 Most of the time I just dump the diapers and liners out into Titus' closet and shut the doors and walk away.
Just keepin' it real : )

I have a 15-month-old son, and I have been using cloth diapers since he was 3 months old. The main reason I didn't use them before that was because his little legs were too small for the one-size diapers (he was only 4 lb. 4oz. when he was born). Now that I am more comfortable with cloth, I want to start cloth diapering earlier with the next one, using prefolds and covers. The prefold system is a lot more intimidating to me, but it has the advantage of fitting even tiny newborns.
I have learned a lot by trial and error, and I want to share what I have learned, in the hopes that other people might be able to use some of the same methods that I use.
I currently have 24 one-size pocket diapers. I have had as few as 12 diapers in my rotation, and I got by, but I really had to stay on top of the laundry, and a lot of times I resorted to disposables because I didn't have any clean diapers. With 24 diapers I wash 2-3 times a week, which is usually when the diaper pail is full, and I don't have to worry about running out of diapers.

I also use cloth wipes. To me it just makes sense, I can just throw the wipes in with the diapers and wash everything together. Before Titus was born I sewed some flannel wipes, thinking flannel would be nice and soft, but flannel is actually a little rough once it is wet, and it is not very good at removing solids. Next I tried pieces of fleece, but fleece repels water, so that didn't work very well as wipes. Finally, I decided to try some washcloths I had gotten as a shower gift, and they were perfect! The terrycloth has some texture to help dislodge sticky poop, and they are easy to maneuver, and very soft. The key is to get the very thin, inexpensive ones. I bought a pack of 10 from Kmart for $4.50. Here is an example of washcloths that look like the right kind.
I keep them in an old wipes container, and I put them in while they are still damp from the wash. I add a little bit more water so they are nice and wet, and I keep a little bottle of baby shampoo at the changing table and put a drop of that on a wipe to get Titus nice and clean if he has pooped. I would recommend having at least a dozen cloth wipes.

My diaper pail is a trashcan with a lid that I got at Target. I made 2 liners for it out of PUL, so I can just pull out the liner and wash it with the diapers. That way I don't have to wash out the diaper pail as often. To make each diaper pail liner I took a yard of PUL, and folded it in half widthwise so it was 36" X 21". Then I sewed a french seam around the bottom and side, to create a bag.


Diaper changes are usually pretty painless. Take off the diaper, pull out the liner, dump both in the diaper pail. However, if there is poop involved it becomes a little more interesting. Newborn, breastfed poop is just fine to go in the wash, I never had problems with it washing out. But once the baby starts solid foods if you don't rinse all the poop off into the toilet you will find partially digested food and other questionable things in your washing machine (gross!). You can hold the clean part of the diaper and swish it around in the toilet to dislodge the poop, but I found that to be messy and not always very effective.
A friend generously gave us her diaper sprayer, and I love it so much! It "power washes" the poop off the diaper, and is quick and efficient. The only downside that I can see to the diaper sprayer is that the spray doesn't always stay in the toilet, so it can be a little messy. That really doesn't bother me, I just wipe it up with toilet paper, but I thought it was worth mentioning.

However...

Just keepin' it real : )
Tuesday, November 1, 2011
Buying cloth diapers
This week I am going to be doing a three-part series on cloth diapering. I was very intimidated when I started using cloth diapers because I didn't know many people that used cloth. So, I did some research on the internet, and I learned a lot from the blogs that I read.
I have used cloth diapers for about a year now, and I want to share what I have learned so that other people can benefit from my experiences, and to hopefully encourage any mothers (or fathers) that are interested in using cloth diapers. It really isn't very hard : )
To begin this series, I am going to share how I decided on the particular brand and style of diapers that I use. There are so many options, I think there is really something for everyone. I hope the information I provide here will lead you to make an informed decision if you are considering cloth.
The three main choices...
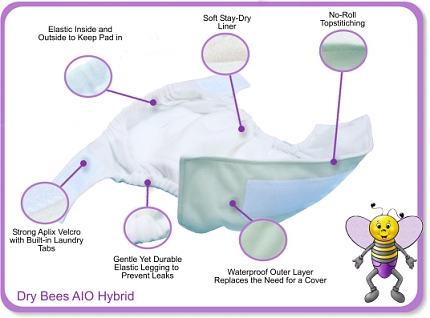
All-in-one diapers - These are the simplest kind of diaper to use. All-in-ones are the most similar to disposable diapers. Their main advantage is ease of use, and the biggest downside is a long drying time.

Pocket diapers - These are the kind of diapers I use with Titus. They have a main diaper piece with a built-in cover, and there is a microfiber insert that is slipped into a pocket in the diaper. I picked them because they are more user friendly then prefolds, but take less time to dry than all-in-ones.
 Prefolds & covers - This is the most cost effective system. Prefold diapers are usually around $1 each. Covers are more expensive, but not as expensive as pocket diapers or all-in-ones, and you don't need as many of them. You can buy wool, PUL, or nylon covers. The main disadvantage to using prefolds is that they are more work, and can be very intimidating to husbands, grandparents, babysitters, etc.
I have only used 2 of the numerous cloth diaper brands available, so I will just cover those 2 brands. But please don't feel like you are limited to only those 2 brands. You can buy diapers from major retailers such as Cotton Babies or Diapers.com, purchase from sellers on ETSY, or make your own cloth diapers if you are a good seamstress and very ambitious : )
I have used Fuzzibunz and BumGenius diapers with Titus. Here are my opinions on them:

BumGenius - one-size pocket diapers
This is my diaper of choice and the one I most recommend to people, for the following reasons:
- They last for a long time. I have BumGenius that I received used, that had been used to diaper 2 babies before Titus, and I still got a few more months out of them.
- They come in fun colors :)
-They have a good warranty. The velcro tabs and the elastic are the first things to wear out, but you can buy replacement kits for $1 each.
-The inside is soft and cozy
-The velcro closures and the snaps for adjusting size are very easy to use
-I have one-size diapers, which means the same diapers should last until Titus is potty-trained
The only thing that I have disliked about my BumGenius diapers is the fact that Titus can undo the velcro himself, which can be messy and annoying. If this is a major problem for you, BumGenius also sells diapers with snap closures.

Fuzzibunz - one-size pocket diapers
Some of the benefits to Fuzzibunz diapers are:
- The snap closure prevents babies from taking off their own diapers
- The leg elastics are adjustable, which means less leakage, because you can always ensure a good fit
- Again, cute colors : )
-They are also one-size, so the same diapers should last until potty-training
I have 2 Fuzzibunz and I like them, but not as much as the BumGenius. I think all the snaps are a little overwhelming, and they definitely don't fasten as quickly as velcro. Also, the inside is fleece, which was nice and soft at first, but it pilled up and is not as nice anymore. : (
In summary, I really like the BumGenius one-size pocket diapers. I have used them for a year with Titus and have been very happy with them : ) Tomorrow I will talk about how I make cloth diapers work for our family, and some helpful tips I have learned in the process.
I have used cloth diapers for about a year now, and I want to share what I have learned so that other people can benefit from my experiences, and to hopefully encourage any mothers (or fathers) that are interested in using cloth diapers. It really isn't very hard : )
To begin this series, I am going to share how I decided on the particular brand and style of diapers that I use. There are so many options, I think there is really something for everyone. I hope the information I provide here will lead you to make an informed decision if you are considering cloth.
The three main choices...
All-in-one diapers - These are the simplest kind of diaper to use. All-in-ones are the most similar to disposable diapers. Their main advantage is ease of use, and the biggest downside is a long drying time.
Pocket diapers - These are the kind of diapers I use with Titus. They have a main diaper piece with a built-in cover, and there is a microfiber insert that is slipped into a pocket in the diaper. I picked them because they are more user friendly then prefolds, but take less time to dry than all-in-ones.
I have only used 2 of the numerous cloth diaper brands available, so I will just cover those 2 brands. But please don't feel like you are limited to only those 2 brands. You can buy diapers from major retailers such as Cotton Babies or Diapers.com, purchase from sellers on ETSY, or make your own cloth diapers if you are a good seamstress and very ambitious : )
I have used Fuzzibunz and BumGenius diapers with Titus. Here are my opinions on them:
BumGenius - one-size pocket diapers
This is my diaper of choice and the one I most recommend to people, for the following reasons:
- They last for a long time. I have BumGenius that I received used, that had been used to diaper 2 babies before Titus, and I still got a few more months out of them.
- They come in fun colors :)
-They have a good warranty. The velcro tabs and the elastic are the first things to wear out, but you can buy replacement kits for $1 each.
-The inside is soft and cozy
-The velcro closures and the snaps for adjusting size are very easy to use
-I have one-size diapers, which means the same diapers should last until Titus is potty-trained
The only thing that I have disliked about my BumGenius diapers is the fact that Titus can undo the velcro himself, which can be messy and annoying. If this is a major problem for you, BumGenius also sells diapers with snap closures.
Fuzzibunz - one-size pocket diapers
Some of the benefits to Fuzzibunz diapers are:
- The snap closure prevents babies from taking off their own diapers
- The leg elastics are adjustable, which means less leakage, because you can always ensure a good fit
- Again, cute colors : )
-They are also one-size, so the same diapers should last until potty-training
I have 2 Fuzzibunz and I like them, but not as much as the BumGenius. I think all the snaps are a little overwhelming, and they definitely don't fasten as quickly as velcro. Also, the inside is fleece, which was nice and soft at first, but it pilled up and is not as nice anymore. : (
In summary, I really like the BumGenius one-size pocket diapers. I have used them for a year with Titus and have been very happy with them : ) Tomorrow I will talk about how I make cloth diapers work for our family, and some helpful tips I have learned in the process.
Subscribe to:
Posts (Atom)