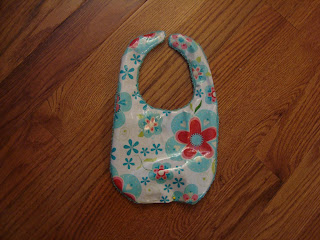
I combined a few bib ideas to make one that is practical for Titus, who is your average messy toddler. I made a bib out of laminated cotton only, but it seemed kind of flimsy to me. So, I decided to try backing it with terry cloth. I have made cotton bibs backed with terry cloth as baby shower presents, but they are just little bibs for drool protection. The resulting hybrid bib features laminated cotton, which is waterproof, and terry cloth, which doubles as a washcloth after the meal. It is also big enough to protect a large area of Titus' clothing. So far I have been very happy with this bib, so I created a tutorial so you can make them too!
You will need:
- A bib pattern, or an already made bib to trace
- Sewing machine and thread
- Velcro
- Laminated cotton
- Terry cloth (I used part of a hand towel leftover from another project)
1. Trace the bib pattern onto the back of the laminated cotton with a sharpie. I'm sorry I don't have a PDF file for this, my computer skills are just not that sophisticated yet. The pattern I used is 8" by 13.5". If you trace around an existing bib you will need to add 1/4" all around for seam allowance.
2. Pin the laminated cotton piece to the terry cloth, right sides together
3.Cut out the bib along the sharpie line, leaving the pins in place
4. Sew around the perimeter of the bib with a 1/4" seam allowance. Leave a 2-3" gap at the bottom of the bib for turning the bib right side out (it should still be inside out at this point)
5. Trim off any excess fabric, and clip slits every 1/2" or so around all the curves, as shown below. This will enable the curved parts to be turned more smoothly.
6. Turn the fabric right side out, it should look like this:
7. Turn the fabric of the unsewn section under and pin it, making sure it looks even
8. Topstitch around the bib, 1/8" from the edge. By topstitching you should sew up the section of the bib that was open, so there should be no raw edges or openings
9. Cut a 1" square piece of Velcro, and sew the fuzzy side onto the laminated cotton side of one neck strap (check the placement of your Velcro before you sew it on, to make sure the bib closes correctly. It would be frustrating to sew it onto the wrong side)
10. Sew the pokey side onto the terry cloth side of the other neck strap
11. Yay! You are done! Now put your bib on the nearest messy toddler and see it in action :)
This post is linked to: Sew Cute Tuesday


This is such a cute bib! I wish I had thought about something like this when my kids were younger.
ReplyDeletePS Thanks for stopping by my blog and leaving such a sweet comment.